
Best Practices for Optic Cable Installation —
This article focuses primarily on placing fiber optic cables in ducts through vaults or manholes. However, much of the content is also applicable to aerial and direct buried installations. It is intended to be a guide and source of information for both contractors and end users, and is applicable to all outside plant (OSP) cables.
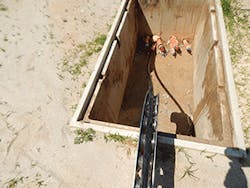
Figure 1. Do not use this equipment to install fiber optic cable — small rollers can make contact points that do not maintain the minimum bend radius of the cable.
An incorrectly installed fiber cable can result in broken fibers and structural damage to the cable — not a good outcome, since service providers pay for and expect an uncompromised cable. This is especially important with the high fiber count cables of 3,000+ fibers that are commonly used today in both data center and OSP environments. Damaging one of these cables is an expensive mistake, in fact, 5 to 10 times more costly than the typical cable sizes commonly used just a couple of years ago.
In addition to loss of a cable due to damage, labor to remove and install a new cable adds to this situation, adding more expense. The good news is that damage to cable during placing operations is avoidable. This article provides installation guidance to follow.
Doing the job correctly and paying attention to details usually does not take any more time than doing it incorrectly. It is a matter of knowing what to do — and doing it.
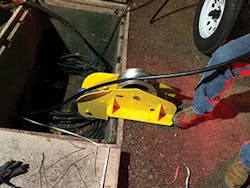
Figure 2. Do not use this equipment to install fiber optic cable — small rollers can make contact points that do not maintain the minimum bend radius of the cable.
5 BASIC RULES
Here are the 5 basic rules to follow when installing any fiber cable.
Rule 1. Minimum Bend Radius (MBR): maintain at all times.
Rule 2. Pulling Tension: do not exceed specification for cable.
Rule 3. Twisting Avoidance: use a break-away swivel, verify load rating is 600 lbs.(industry standard for OSP Cable) or less.
Rule 4. Allow cable to push out of the arbor hole prior to start of placing.
Rule 5. Tighten bolts on wood reels prior to and during installation.
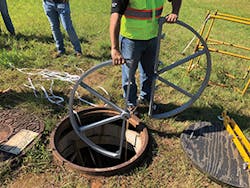
Figure 3. Split 400-inch sheave wheel will fit in a typical manhole opening.
Prior to starting installation, select a well-made cable that has been qualified with industry standards (i.e., Telcordia Generic Requirements or ANSI/ICEA standards). This is important, and is the very first step. It is also a good idea to ensure that the cable selected can be used in the way intended by the service provider. That means there may be some additional handling evaluations needed in addition to requirements contained in the product standards testing. Both the contractor and service provider should find out the level of assistance that the cable manufacturer will provide, including installation/cable access documentation, level of on-site field support and response time.
Next, the service provider should retain an experienced fiber cable installer who uses the correct equipment and procedures. Ensure that the contractor will not subcontract out the work to someone else, without prior written approval.
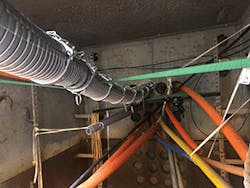
Figure 4. Split 4-inch metal cable guides for use in manholes or large vaults.
BEST PRACTICES CHECKLIST
Best practices for preinstallation and installation items include:
__Verify duct route, all duct bends are within minimum bend radius of cable.
__Verify vaults are large enough for midspan slack teardrops or coils.
__Verify duct diameter to cable diameter allows for cable to be installed
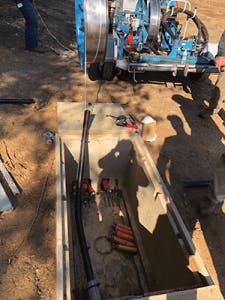
Figure 5. Split 2-inch polyethylene cable guides for use in manholes or large vaults.
__Inspect all manholes and vaults: Are they congested with other cables? How do ducts enter, do they enter straight in? Are they lined up and opposite? Determine if problems exist and correct prior to installation.
__Verify lubricant used is acceptable for cable jacket.
__Inspect cables upon delivery from manufacturer for any damage.
__Store cable reels on a solid surface to ensure they do not sink into the ground.
__Blow out any water in ducts.
__Proof ducts with a mandrel that is 80% fill of duct.
__Placing plan review, identify figure 8 and tugger locations.
__Control cable pay-off; do not let reel over-spin and get tangled.
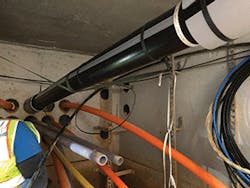
Figure 6. Split 4-inch polyethylene cable guides for use in manholes or large vaults.
__If blowing in cable, ensure the ducts are coupled and can hold pressure; contact duct manufacturer for pressure.
__If blowing in cable, ensure that the correct size unit/compressor for cable Outside Diameter (OD) is used.
__Review the cable specification sheets to become familiar with MBR, Tension, OD, Temperature ranges, etc., and keep them handy during the installation.
__Ensure that sheave wheels and capstans are large enough to maintain minimum bend radius of the cable. The same is for cable guide shoes.
__Do not use any lip rollers or quadrant blocks to guide the placing of cable, since each roller is 2 inches to 4 inches in diameter, and are points of contact to the cable. If needed to get job done, place a split duct on top of the rollers to avoid direct cable contact to each roller.
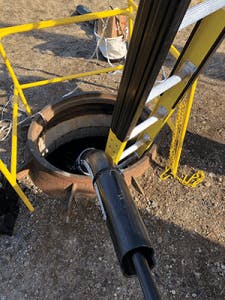
Figure 7. Split 4-inch Polyethylene cable guides for use in manholes or large vaults.
__Use a fabric mesh grip or pull line basket weave instead of a wire mesh pulling grip when space is needed in the duct due to a tight fit of cable in duct.
__Pulling by 2 strong people can exceed 600 lbs. Do not install if you are unsure that load will remain below 600 lbs. or tension specification of the cable.
__Hand pulling in tandem with hand pushing tends to lead to problems due to missed communication or inability to push/pull at the same level. It should be avoided.
__Use a tugger that has an automatic shut off when the maximum tension allowed is approached. Break-away swivels are a safety device in case all else fails, but usually have a tolerance of +/- 10%.
__Use an alternate method to lay out cable instead of a figure 8 when weight of larger cables is too much to flip. Simply route the cable under each loop as it is removed so that the end is on top: no flipping is needed.
__After installation, inspect all slack coils to ensure MBR is maintained, and then test all fibers.
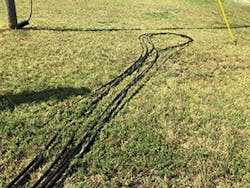
Figure 8. Alternate method instead of figure 8 can be used for heavier cables — commonly called " Railroad Method".
__Damage to cable is not always visible; the cable can appear to be fine, but have fibers broken. This can happen when tension and/or minimum bend radius is not adhered to during installation. Both tension and MBR are equally important, fibers can break with much less than the max allowed tension if the MBR is less than required.
__Equipment exists that will control tension and MBR during installation.
__Auto shut-off tuggers.
__Split cable guides: metal in 4-inch diameter, and MDPE in both 2-inch and 4-inch diameters.
__Split 32-inch and 40-inch sheave wheels for larger cables for use in manholes with round covers.

Figure 9. Alternate method instead of a wire mesh pulling grip is to use a fabric pulling grip in conjunction with a break-away swivel.
__Blowing machines with automated balancing between mechanical pushing and air pressure with automatic shut offs.
REMEMBER: No job is so important to not take the time to perform it safely!
Engineers, contractors, and end customers who use this checklist can almost guarantee fiber cable installation without damage.
About the Author

Ernie Gallo
Principal Outside Plant and Electrical Code Consultant, NEBScore
Background • 44+ years experience in Telecom Industry • 7.5 Years Underwriters Laboratories • 33 Years Bellcore-Telcordia-Ericsson • BSEE Polytechnic University of New York Consulting Focus Areas • Electrical Safety, Electrical Protection • FCC Infrastructure Sharing During Emergencies • Outside Plant Product and Installation Standards and Audit Analytics • Industry Standards and Code Compliance – Regulatory and Safety – construction focused • Fiber to the Home – micro-trench and MDU architecture • Fiber to the Node – VDSL to the home • Wireless Products and Installation Methods • Fiber and 5G Wireless product requirements • Optical Transport Networks –Deployment Designs • Working with local Authorities Having Jurisdiction on Electrical and Fire Codes • Electrical and Fire incidents and evaluations • Expert Witness in the areas of outside plant construction and safety Industry and Project Experience Standards Work National Fire Protection Association (NFPA) • NFPA 1 Fire Code - Committee Member • NFPA 70 National Electrical Code (NEC) - Committee Member CMP1, CMP 16and Correlating Committee Member NFPA 70E -Standard for Electrical Safety in the Workplace - Committee Member • NFPA 780 Standard for the Installation of Lightning Protection - Committee Member • NFPA 855 Standard for the Installation of Energy Storage Systems - Committee Member • NFPA 75, Standard for the Protection of Information Technology Equipment - Committee Member • 2022 Committee Service Award from the Standards Council of the National Fire Protection Association (NFPA) Institute of Electrical and Electronics Engineers (IEEE) • IEEE C2 National Electrical Safety Code - Committee Member, Subcommittees SC2, SC4, SC5, and SC8 • IEEE Wire Line Subcommittee – Vice Chair • IEEE Working Group 3.6.7 Low Voltage Data, Communications and Signaling Circuit Surge Protective Devices – Chair • IEEE Working Group 3.6.10 Surge Protection of Equipment Connected to Both Low Voltage AC Power and Communication Circuits – Vice Chair • IEEE Fiber Optics Subcommittee - Committee Member Association for Telecommunications Industry Solutions (ATIS) • ATIS Board Member • ATIS Protection Engineers Group (PEG) Chair and current Advisory Board Member • ATIS STEP: Sustainability in Telecom: Energy and Protection Committee – Vice Chair • ATIS Network Power Systems (NPS) – Chair • ATIS Network Physical Protection (NPP) - Working Group Member • ATIS Network Electrical Protection (NEP) –Chair Underwriters Laboratories (UL) • Fault Managed Power Working Group UL1400 - Committee Member • Lightning Protection Components UL 96, 96A Lightning Protection Components - Committee Member • UL 497 Standard for Protectors for Communications • UL 1449 Standard for Surge Protective Devices - Committee Member • CAN/US Technical Harmonization Committee UL 62368 Standard
Ernie serves as ATIS PEG Chair. Please see https://peg.atis.org for details.